

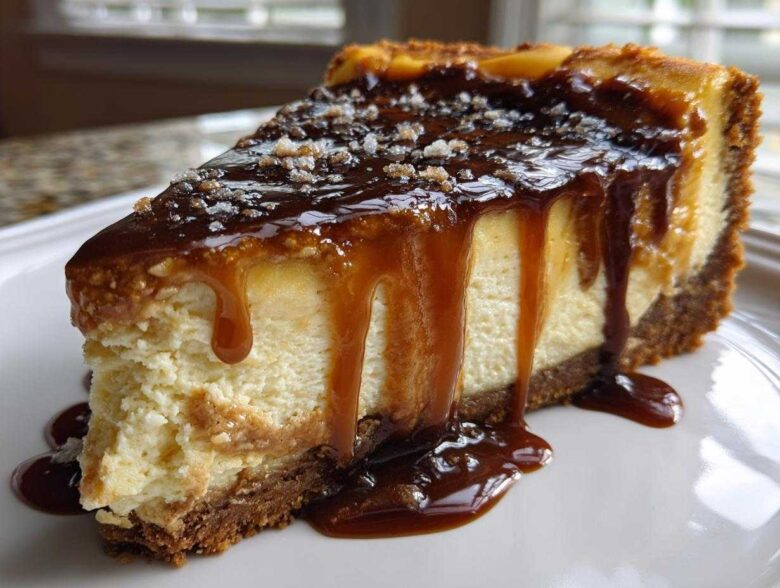
Oh, honey, if you want a dessert that stops every conversation at the table, we absolutely need to talk about this salted caramel cheesecake. Forget those sad, gummy store-bought versions; this is the real deal. We’re making a decadent, baked masterpiece, and trust me, the secret for this ultimate version is twofold: a crunchy Biscoff cookie crust and a homemade salted caramel sauce you’ll want to drink straight from the pan.
I remember stressing over Christmas dessert a few years back. Nothing felt special enough until I finally nailed this exact recipe. The balance of sweet, salty, and spicy cookie crunch just sings! If you follow my steps precisely for wrapping that pan, you’ll end up with the creamiest texture possible. This is, hands down, the best salted caramel cheesecake you will ever serve.
If you want to read a little more about my baking philosophy over at the site, you can check out our story here.
Why This is the Best Salted Caramel Cheesecake Recipe
It’s not bragging if it’s true, right? This recipe rises above the rest because we nail every detail that makes a cheesecake truly memorable. You deserve a dessert that is foolproof and totally show-stopping. This combination gives you those perfect sweet and salty treats every time.
- The texture is unbelievably smooth—no lumps, no cracks, just pure richness.
- That homemade salted caramel swirl melts beautifully into the filling.
- We’re skipping the boring graham cracker crust for something spiced and crunchy!
Achieving the Ultimate Creamy Cheesecake Recipe Texture
It all comes down to taking your time with the prep. Everything—and I mean EVERYTHING—must be at room temperature. Seriously, take the cream cheese and eggs out hours early! Plus, we always use a water bath. That gentle steam keeps the environment humid, which is how you guarantee that signature creamy cheesecake recipe texture without any dreaded cracks.
The Appeal of a Salted Caramel Cheesecake with Biscoff Crust
This is my favorite part! Most cheesecakes just use plain cookies, but Biscoff cookies have that hint of cinnamon and spice. When you bake that crust, it gets this incredible toasted depth. That warmth plays off the deep, salty sweetness of our caramel perfectly. It’s a flavor explosion that makes this the ultimate biscoff crust cheesecake experience.
If you want to see how I tackle other cheesecake variations, check out my guide on the ultimate cheesecake recipe!
Ingredients for Your Decadent Salted Caramel Cheesecake
Okay, let’s get down to business! The success of this salted caramel cheesecake hinges entirely on knowing exactly what goes into the mix. You can’t just eyeball things here; precision is key for that flawless top layer and that dream texture we talked about. Having everything measured out first means the mixing process flows smoothly, and you won’t accidentally overmix!
For the Biscoff Cookie Crust
We need the crunch to stand up to that rich filling, so make sure those cookies are crushed finely! You will need:
- 1 1/2 cups Biscoff cookie crumbs (get these in a food processor, honey!)
- 1/4 cup granulated sugar
- 6 tablespoons unsalted butter, melted
For the Rich Creamy Cheesecake Filling
Remember what I said about room temperature? It matters for this part! We are aiming for the absolute best moist cheesecake filling possible. These ingredients ensure it:
- 3 (8 ounce) packages cream cheese, softened (seriously, fully softened!)
- 1 1/2 cups granulated sugar
- 1 teaspoon vanilla extract
- 1/4 teaspoon salt
- 4 large eggs (room temperature, please!)
- 1/2 cup sour cream
- 1/2 cup homemade salted caramel sauce (for the swirl)
For the Homemade Salted Caramel Sauce and Topping
This is where the magic happens—the sweet and salty symphony! Make sure you have enough for swirling AND topping it beautifully at the end. Don’t skimp!
- 1 cup homemade salted caramel sauce (you’ll use this for drizzling after baking)
- Flaky sea salt (this is non-negotiable for garnish!)
Essential Equipment for a Perfect Salted Caramel Cheesecake
You know, I sometimes try to make big desserts with just whatever mixing bowl I have handy, but for a showstopper like this salted caramel cheesecake, you really need the right tools. Trying to wrestle this beauty out of a regular cake pan would be disastrous! Having these key pieces ready makes the whole process feel less stressful and far more professional, which is key for maintaining that smooth, rich creamy dessert texture.
So, grab your gear! Here’s what you absolutely need before you start mixing up that crust:
- A 9-Inch Springform Pan: This is non-negotiable for cheesecakes! The removable sides mean you can serve it like a cake without ever having to pry the sides away or risk destroying the beautiful edge we worked so hard on.
- Heavy-Duty Aluminum Foil: We need industrial strength here, not that flimsy stuff! You’ll be using several layers to wrap the pan tightly to make sure not a single drop of the water bath seeps into the crust.
- A Large Roasting Pan: This is the foundation of our water bath setup. It needs to be big enough to hold your springform pan with plenty of room around the edges so you can safely pour in the hot water without splashing the sides of the cheesecake batter once it’s already in the oven.
- Electric Mixer: Whether you use a stand mixer or a sturdy hand mixer, make sure you have one that can handle thick batters without overheating. We’re beating a lot of cream cheese!
- A Good Offset Spatula: Perfect for smoothing out the top layer of the batter before we swirl in that gorgeous caramel.
Step-by-Step Baked Cheesecake Tutorial for Your Salted Caramel Cheesecake
This is where we turn those beautiful ingredients into our stunning final salted caramel cheesecake! Listen, cheesecake baking looks intimidating, but it’s really just about patience and temperature control. If you tackle this methodically, you’ll create an unforgettable showstopper dessert. We are following the recipe exactly here, so get your oven preheated to 325°F (160°C) and start wrapping that springform pan—and I mean wrap it *tightly* with that heavy foil!
Preparing and Pre-Baking the Biscoff Crust
First up, get that Biscoff mixture ready. Just dump your crumbs, the sugar for the crust, and that melted butter into a bowl. Mix it up until it looks like wet sand, and then press it down firmly into the bottom of your wrapped springform pan. You want it compact! Pop that into the oven for exactly 10 minutes just to set it. Once it’s done that quick bake, pull it out and let it cool down completely while you handle the filling. Trust me, you can’t swirl caramel into a hot crust!
Mixing the Moist Cheesecake Filling Correctly
Okay, this is the most important tip for a moist cheesecake filling that doesn’t crack: slow and low mixing for the cheese and sugar! Beat your softened cream cheese until it’s cloud-like smooth, and then slowly add the sugar, vanilla, and salt. Now, for the eggs—this is my biggest rule from the pros: add them ONE at a time, and only mix until you see the yolk disappear before adding the next egg. And when I say mix, I mean gently incorporate! If you beat too much air in here, that air expands in the oven and causes cracks. Finish by gently folding in the sour cream until it just comes together.
Creating the Caramel Swirl and Setting Up the Water Bath
Time to layer! Pour half that creamy batter over your cooled crust. Grab your half-cup of the homemade sauce and drizzle it over the top, maybe swirling it once or twice with a butter knife. Then, gently pour the remaining batter on top, and drizzle the rest of that sauce over that final layer. Use your knife again for a light, pretty swirl—don’t overdo it! Now, place that foil-wrapped pan carefully into your larger roasting pan. This is our water bath, so carefully pour hot water into the roasting pan until it’s halfway up the sides of your springform. Don’t splash the batter!
Baking and Cooling the Salted Caramel Cheesecake
Slide that whole setup into the 325°F oven. Bake this beauty for 60 to 75 minutes. You’ll know it’s done when the edges look set but the very center still jiggles like soft Jell-O when you nudge the roasting pan. NO PEAKING aggressively, or the temperature shock might make it cry! The secret to avoiding a collapsed top is this: Turn the oven OFF, crack the door open just a smidge, and let the cheesecake cool slowly right there inside the oven for a full hour. Then, you can take it out to finish cooling on the rack before chilling. This prevents the shocking temperature change that causes cracking in any showstopper dessert recipe!
If you want to see how I make my famous brownies for a different decadent treat, check out my brownie-bottom cheesecake guide!
Making Homemade Salted Caramel Sauce
You absolutely cannot have a spectacular salted caramel cheesecake without an amazing, homemade sauce. Seriously, ditch the jarred stuff! Making your own caramel sauce is shockingly easy, and the flavor difference? Night and day! This sauce is deeply caramelized, rich, and perfectly balanced, making it the star topping for your cheesecake.
You’re going to use this sauce in two places: swirled inside the filling and drizzled over the top later. So, you need a good batch. Don’t be scared of cooking sugar; just follow these steps, and you’ll nail that beautiful amber color. Remember what the notes said: warmth is your friend here!
If you want to see how I use homemade fruit spreads in other recipes, you can check out my easy peach butter recipe!
Here is the method for that gorgeous, decadent drizzle:
- Melt That Sugar: In a medium, heavy-bottomed saucepan (this helps the heat distribute evenly), place your 1 cup of sugar. Set it over medium heat. You need to stir this constantly—and I mean constantly—because we don’t want any parts burning while others are still solid. It will get clumpy, then liquefy, and finally, it will turn a beautiful deep amber color.
- Warm Up the Cream: While the sugar is melting, you need to warm up that 1/2 cup of heavy cream. We do this because if you pour cold cream into hot sugar, it will seize up and harden instantly! Keep the cream warm, just steaming slightly, on a back burner.
- The Scary Part (But Don’t Panic!): When your sugar is that perfect deep amber—watch the color closely, it goes from perfect to burnt fast!—immediately remove the pan from the heat. Slowly, carefully, whisk in the warmed heavy cream. It will bubble up violently, spitting and steaming like crazy! That’s normal. Keep whisking until it smooths out.
- Finish It Off: Now, whisk in your 1/4 cup of butter (cut into cubes) until it’s all glossy smooth. Finally, stir in your 1 teaspoon of salt. Taste it! Does it need a pinch more? Go ahead.
- Chill and Use: Let this homemade salted caramel sauce cool down completely before you use half of it in the cheesecake swirl and keep the rest chilled for drizzling over the top before you serve your masterpiece. It will thicken considerably as it cools.
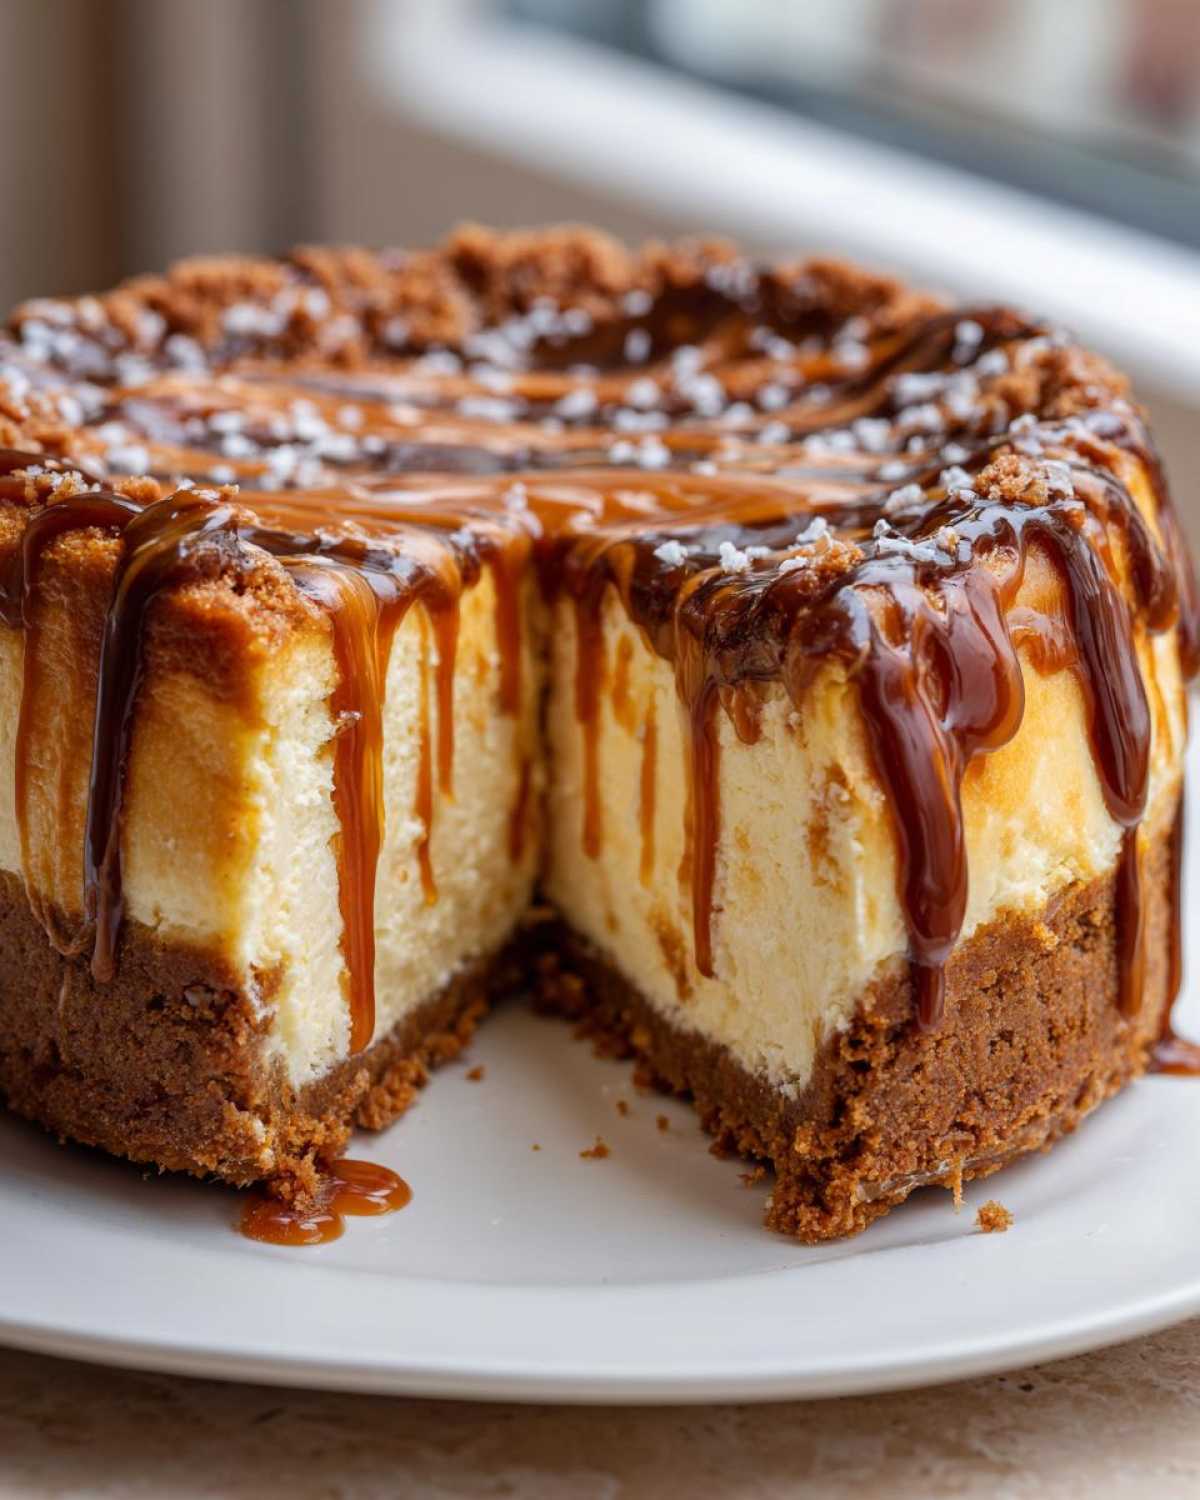
Tips for Success with Your Baked Salted Caramel Cheesecake
Now that you’ve successfully navigated the mixing and the water bath—which, by the way, is the absolute number one defense against a weeping or cracked top—let’s talk about maintaining that stunning appearance. Getting a truly rich creamy dessert isn’t just about the ingredients; it’s about respecting the process! I’ve seen people rush this at the very end, and bam, beautiful cake ruined by a dry crack across the top.
Remember how I stressed room temperature ingredients earlier? I’m repeating it because it’s the gospel truth for cheesecake success! If your cream cheese is cold, you’ll end up mixing way too long trying to smooth it out, which means you’re incorporating air. Air equals bubbles, and bubbles equal cracks. So, please pre-plan and let that cream cheese and those eggs sit out for at least two hours. It just melts together so beautifully when everything is just right.
Speaking of the final product, if you want more highly calibrated recipes that give you amazing results, check out my post on pumpkin spice waffles—it’s all about perfect ratios there too!
Troubleshooting Common Cheesecake Cracks
Okay, say you’ve followed directions, you wrapped the foil tight, you used the water bath, but you are still nervous about cracks? That’s totally normal for a baked dessert! The biggest culprits are always temperature shock and over-baking. You want that slight jiggle in the center when you pull it out, remember? If you bake it until it looks totally firm, it will shrink as it cools and form a crater.
The second key measure is the cooldown. I know it’s tempting to yank that beautiful salted caramel cheesecake right out of the oven and stick it in the fridge to chill faster. Don’t do it! That rapid temperature drop from hot oven to cold kitchen air is what shocks the structure. That slow, one-hour cool-down inside the turned-off oven, with the door propped open just a tiny bit, acts like a gentle transition zone. After that hour, it’s ready for the fridge for its marathon chill time! Follow those two steps—gentle heat and slow cooling—and I promise, you’ll get that smooth, unbroken top you’re dreaming of.
Storage and Serving Suggestions for Your Salted Caramel Cheesecake
You did it! You baked the most incredible salted caramel cheesecake, and now comes the hardest part: waiting. I know, I know, the smell alone is torture when it’s sitting there cooling. But you absolutely have to respect the chilling time here. This is a rich, dense dessert, and it needs time for the flavors to truly marry and for the filling to set up properly. If you try to slice it after just two hours, it will weep and collapse!
My rule of thumb is this: it needs at least six hours, but honestly, for the ultimate cheesecake recipe experience, you absolutely must let it chill overnight in the fridge. When it’s completely chilled, the caramel swirl locks in place, and the whole thing turns into that luxurious, sliceable dessert we are aiming for. It’s the perfect holiday cheesecake because you can make it completely the day before the party!
When you’re ready to serve, just pop off the springform side, give it one last generous drizzle of that leftover homemade caramel sauce, and scatter just a sprinkle of flaky salt on top. It looks stunning!
If you’re looking for other make-ahead desserts perfect for big gatherings, you should definitely check out my apple cinnamon pull-apart bread—it’s a huge crowd-pleaser!
Make-Ahead and Freezer Tips
Good news—this cheesecake freezes like a dream! Because it’s so rich, it holds up wonderfully. If you know you won’t be eating it within about five days, wrapping it properly allows you to freeze it for up to a month. This is a lifesaver when you need a make-ahead dessert for a busy week!
Here is how I prep it for the deep freeze: Make sure the cheesecake is completely cooled and set in the fridge first. Then, wrap the entire thing (still on the springform base, if you can manage!) tightly in two layers of plastic wrap. Really press that plastic wrap against the top surface to prevent freezer burn. Follow that with a tight layer of heavy-duty aluminum foil. You want zero air exposure!
When you’re ready to thaw your amazing salted caramel cheesecake, just move it from the freezer directly to the refrigerator. Let it thaw slowly for a full 24 hours. Don’t rush this part by leaving it on the counter! Once it’s thawed in the fridge, remove all the plastic wrap, let it sit on the counter for about an hour to warm up just slightly, and then it’s ready for that final caramel topping!
Frequently Asked Questions About Salted Caramel Cheesecake
I know sometimes when you’re reading a recipe this detailed, a few random questions pop into your head right before you jump into the kitchen. Don’t worry, I get it! We’ve all been there wondering if we can swap out an ingredient or if we missed a crucial step for getting that gorgeous slice. Here are the most common things people ask me about perfecting their salted caramel cheesecake.
If you have a question that isn’t answered here, feel free to drop me a line on my contact page! You can reach out here.
Can I make this a no bake cheesecake salted caramel version?
That’s a great question! While you absolutely *can* make a no bake cheesecake salted caramel version, you’ll miss out on the signature texture we chased so hard in this recipe. The baked version, especially when using the water bath, gives you that dense, rich, slightly tangy center that holds up perfectly against the sweet caramel. No-bake versions rely heavily on gelatin or condensed milk, which results in a fluffier, lighter texture—more like a mousse. For this particular flavor profile—the deep, buttery richness of baked cheese mixed with caramelized sugar—I strongly recommend sticking to the baked method for the ultimate experience!
What is the best way to cut a clean slice of salted caramel cheesecake?
This technique is vital, especially when you have that gorgeous caramel drizzle on top that’s meant to ooze just a little, not slide everywhere! You can’t just hack at it with a cold knife, or you’ll smear that beautiful caramel all over the plate and ruin the clean look. For a perfect slice every time, you need a hot knife. Fill a tall glass with very hot water. Dip the blade of a long, thin, sharp knife into the water for about 10 seconds, wipe the blade completely dry with a clean towel, and then make your cut straight down through the cheesecake. Wipe the knife clean again, re-heat it in the water, and repeat for every single slice. It works like magic and gives you that professional look!
If you’re looking for other desserts that are a little easier on the slicing front, you might enjoy my recipe for no-bake peanut butter pie!
Nutritional Estimates for This Decadent Dessert
Now, let’s talk numbers. I always tell people that this salted caramel cheesecake is an indulgence, especially with that homemade sauce and the buttery Biscoff crust, so track this responsibly! We’re aiming for a showstopper dessert here, and frankly, calories don’t count when the flavor is this good. But for those of you who like to keep track, I’ve compiled the average estimates based on the ingredients we used for a standard slice.
Please remember that because we are using homemade caramel sauce and specific brand cookies, these are only close estimates. If you want the full legal breakdown, you can always check out our standard baking disclaimer here.
Here is the general nutritional profile per slice (based on 12 servings):
- Calories: Around 550 per slice. Yup, it’s rich!
- Total Fat: About 35g, with 20g being saturated fat. That’s the butter and cream cheese doing their delicious work!
- Carbohydrates: We’re looking at roughly 58g, mostly coming from the sugars in the caramel and filling.
- Protein: A modest 8g, thanks to all that lovely cream cheese.
- Sodium: About 350mg—that’s where that essential flaky sea salt comes in to balance the sweetness!
It’s a rich creamy dessert, through and through, and meant for savoring!
Share Your Perfect Salted Caramel Cheesecake Experience
Well, there you have it! You have all the secrets, the techniques, and the confidence to bake the most stunning salted caramel cheesecake your kitchen has ever seen. That Biscoff crust just waits for you to slather that homemade caramel over the top!
Now, this recipe isn’t truly finished until I hear from you! I want to know how it turned out. Did you manage to get that perfect swirl going? Did your family practically fight over the leftover slices? Please, please leave a comment below telling me what you thought! I read every single one.
If you made this and took a picture—and frankly, you *must* have taken a picture because it’s stunning—tag me on social media! Seeing your creations is genuinely the best part of doing what I do here on the blog. It keeps me motivated to share all my favorite holiday and decadent dessert recipes with you all.
If you’ve got questions about adjustments or just want to chat about everything sweet and salty, don’t hesitate— you can get in touch with me right here. Happy baking, and may your cheesecake be perfectly creamy!
PrintDecadent Baked Salted Caramel Cheesecake with Biscoff Crust
A recipe for a rich, creamy baked cheesecake featuring a crunchy Biscoff cookie crust and topped with a homemade salted caramel sauce.
- Prep Time: 30 min
- Cook Time: 75 min
- Total Time: 115 min
- Yield: 12 servings
- Category: Dessert
- Method: Baking
- Cuisine: American
- Diet: Vegetarian
Ingredients
- 1 1/2 cups Biscoff cookie crumbs
- 1/4 cup granulated sugar (for crust)
- 6 tablespoons unsalted butter, melted (for crust)
- 3 (8 ounce) packages cream cheese, softened
- 1 1/2 cups granulated sugar (for filling)
- 1 teaspoon vanilla extract
- 1/4 teaspoon salt
- 4 large eggs
- 1/2 cup sour cream
- 1/2 cup homemade salted caramel sauce (for filling swirl)
- 1 cup homemade salted caramel sauce (for topping)
- Flaky sea salt (for garnish)
Instructions
- Preheat your oven to 325°F (160°C). Wrap the outside of a 9-inch springform pan tightly with heavy-duty aluminum foil.
- Prepare the crust: Mix the Biscoff crumbs, 1/4 cup sugar, and melted butter until combined. Press the mixture firmly into the bottom and about 1 inch up the sides of the prepared pan. Bake for 10 minutes. Let cool.
- Prepare the filling: Beat the softened cream cheese with 1 1/2 cups sugar, vanilla extract, and salt until smooth. Scrape down the sides of the bowl.
- Beat in the eggs one at a time, mixing just until incorporated after each addition. Mix in the sour cream until the batter is smooth. Do not overmix.
- Pour half of the cheesecake batter over the cooled crust. Drizzle half of the 1/2 cup caramel sauce over the batter. Pour the remaining batter on top. Drizzle the remaining caramel sauce over the top layer. Use a knife to gently swirl the caramel into the batter.
- Place the foil-wrapped springform pan into a large roasting pan. Carefully pour hot water into the roasting pan until it reaches halfway up the sides of the springform pan (water bath).
- Bake for 60 to 75 minutes, or until the edges are set and the center jiggles slightly when gently nudged.
- Turn off the oven, crack the door open slightly, and let the cheesecake cool in the oven for 1 hour.
- Remove the cheesecake from the water bath and foil. Cool completely on a wire rack. Once cool, cover and refrigerate for at least 6 hours, preferably overnight.
- Before serving, remove the sides of the springform pan. Drizzle the remaining 1 cup of salted caramel sauce over the top and sprinkle with flaky sea salt.
Notes
- For the best texture, ensure your cream cheese and eggs are at room temperature before mixing.
- To make the homemade salted caramel sauce, combine 1 cup sugar, 1/2 cup heavy cream (warmed), 1/4 cup butter, and 1 teaspoon salt in a saucepan over medium heat, stirring until the sugar dissolves and turns amber, then slowly whisk in the warm cream and butter.
- If you skip the water bath, you risk the cheesecake cracking or becoming dry.
Nutrition
- Serving Size: 1 slice
- Calories: 550
- Sugar: 55g
- Sodium: 350mg
- Fat: 35g
- Saturated Fat: 20g
- Unsaturated Fat: 15g
- Trans Fat: 0g
- Carbohydrates: 58g
- Fiber: 1g
- Protein: 8g
- Cholesterol: 120mg