

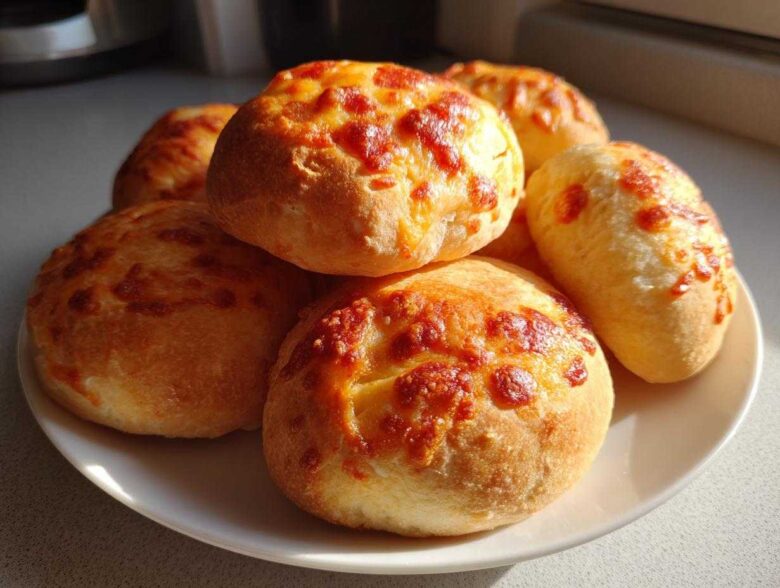
Are you ever just staring into the fridge at 4:30 PM wondering how you’re possibly going to produce a snack that the kids (or you!) will actually eat before dinner? Believe me, I know that panic! That’s exactly why I perfected these incredible Pepperoni pizza bites. Seriously, these are the absolute EASIEST, FASTEST pizza bites you will ever make, and they come together quicker than ordering delivery. I first whipped these up for a spontaneous game night when I realized I had nothing decent on hand, and now they are mandatory for every family get-together.
They’re perfectly portable—crispy on the outside, gooey and cheesy on the inside—and they use simple crescent roll dough, so there’s zero yeast fuss. You won’t need to roll out a massive dough ball; we’re talking about 25 minutes start to finish. Get ready to bookmark this recipe because these baked pepperoni bites are about to become your secret weapon for quick appetizers and epic after-school snacks!

Why These Pepperoni Pizza Bites Are Your New Favorite Easy Pepperoni Pizza Bites Recipe
I’m telling you, these simple pizza snacks do it all! If you’re looking for a recipe that won’t suck up your entire evening, this is it. They are genuinely perfect, and I’ve made them so many times that they come out crisp and golden every single time.
- Incredible Speed: We’re talking about 10 minutes prep and 15 minutes bake time. That’s total focus for under half an hour!
- Kid-Approved Guarantee: They disappear instantly when the little ones see them.
- Super Portable: Great for lunchboxes or tossing into a party platter.
- Minimal Mess: Since we are using pre-cut dough, cleanup is ridiculously fast.
If you love quick fixes, this easy pepperoni pizza bites recipe is going to change your life. Trust me on this one!
Gathering Your Ingredients for Simple Cheesy Pepperoni Pizza Bites
Okay, the best part about this recipe is how little stuff you actually need. We are relying heavily on a few store-bought heroes, which is why we can pull these together so fast. You don’t need yeast, you don’t need yeast, and you definitely don’t need to wait for anything to rise!
When I do this on a Tuesday evening, I grab everything right from the fridge door. The quality of your cheese matters here, though—don’t skimp on that mozzarella, or you won’t get that glorious cheese pull!
Dough and Sauce Base
- One can (it’s about 8 ounces) of the refrigerated crescent roll dough—the kind that comes in a tube, you know the one!
- About half a cup of your favorite pizza sauce.
- A tiny splash of flavor mixed right into the sauce: half a teaspoon of garlic powder.
The Cheesy Pepperoni Filling
- We need a full cup of shredded mozzarella cheese. Make sure it’s pre-shredded or shred it yourself just before using.
- Half a cup of those cute little mini pepperoni slices. Small pepperoni equals maximum coverage per bite, which is important, in my opinion!
Finishing Touches
This is what takes them from “good” to “irresistible.” Before they go into the oven, we brush the tops with:
- One tablespoon of melted butter.
- I usually mix that butter with just a *tiny* pinch more garlic powder, just for extra aroma when they bake!
Step-by-Step Guide to Perfect Pepperoni Pizza Bites
This is where the magic happens, and I promise, it’s unbelievably straightforward. We aren’t dealing with any fussy techniques here. It’s all about layering and rolling. If you follow these steps exactly, you’ll get beautiful, sealed Pepperoni pizza bites every single time without the filling oozing out everywhere—which is always my main goal!
Before we start scooping sauce, get your oven ready so things move fast once the dough is prepped. I always lay out a sheet of parchment paper right on my baking rack so nothing sticks and cleanup is a dream.
Preparing the Oven and Dough for Pepperoni Pizza Bites
First thing: fire up that oven to 375 degrees Fahrenheit. You want it hot and ready to go! While it heats up, gently unroll your tube of crescent roll dough. Be careful when you pop that tube open—they tend to startle you! Once it’s open, separate the dough into its 8 individual triangles. You should have 8 perfect little potential pockets right there.
You’ll also want to quickly mix that half a cup of pizza sauce with the specified garlic powder in a tiny bowl. Mixing the spice in now ensures even flavor distribution instead of trying to sprinkle it on top later.
Assembling Your Bite Size Pizza Appetizers
This layering order is key to making sure they hold their shape. Take a triangle, and focus on the wide end—that’s where we start building. Place just about one tiny teaspoon of that saucy mix right onto the widest part of the dough. Don’t glob it on, or you’ll have filling pushing out later!
Next, sprinkle a good tablespoon of your mozzarella cheese right over the sauce. Then, top that with 3 or 4 mini pepperoni slices. You want to distribute the toppings evenly across the whole surface area of the triangle so every bite has that perfect pizza punch.
Rolling and Baking the Baked Pepperoni Bites
Now for the critical part! Starting from that wide, loaded end, roll the triangle up snugly toward the tip, just like you would a standard crescent roll. The absolute **most important thing** is to pinch those seams together really well! I usually roll it once, then roll it slightly tighter, and pinch the line where the edges meet. This really helps prevent baked pepperoni bites from exploding cheese everywhere while they cook. Place them seam-side down on your baking sheet.
Once they are all lined up nicely, melt that tablespoon of butter and brush it lightly over the tops. This is what gives them that beautiful, deep golden color. Bake them for 12 to 15 minutes at 375 degrees. They’re done when the dough isn’t pale anymore and is totally puffed up and golden brown. Let them sit for just five minutes to cool down before you dig in, or you’ll burn your mouth!
If you want to see the dough technique in action, check out my guide for homemade garlic breadsticks; the rolling logic is surprisingly similar!
Tips for Success Making Your Pepperoni Pizza Bites
Listen, even when a recipe is this easy, there are always little tricks that separate the “meh” snacks from the “OMG, make more!” snacks. I’ve learned these bits through trial and error, especially when I make huge batches of these Pepperoni pizza bites for parties. You don’t want an oily mess, nor do you want dry dough!
The goal is a perfect, portable package, so control over the wet stuff is paramount. If you follow these small pointers, your pizza bites will come out looking exactly like they came straight from my kitchen!
Controlling Moisture in Your Pepperoni Pizza Bites
Sauce is the biggest culprit for soggy bottoms or leaky snacks. If you’re using a store-bought sauce that seems incredibly watery, don’t just dump it on there! Tip: Lay your sauce on a paper towel-lined plate for about five minutes to let the excess liquid soak away before mixing it with the garlic powder. You only want the paste, not the watery bits.
Also, don’t overload on the cheese! If you pile the mozzarella too high, no matter how well you pinch the dough, some cheese is going to escape the seam and burn onto your pan. Stick to that one tablespoon measurement per triangle, and watch your seals!
Achieving Golden Brown Tops on Pepperoni Pizza Bites
That melted butter on top isn’t just for looks, though it certainly helps them look fantastic alongside something simple like my Reuben dip. The butter helps the exterior crisp up beautifully, mirroring that crust texture we love on a proper slice.
Placement in the oven matters, too. Don’t overcrowd your baking sheet! Give each rolled bite a little room to breathe—about an inch apart. If they are touching, they will steam instead of bake, and you lose that crisp outer layer. Keep them on the center rack for the most even heat around, ensuring those tops get perfectly golden brown and buttery!
Ingredient Notes and Substitutions for Pizza Dough Appetizers
So, I know we all love the ease of crescent rolls, right? They’re flaky, buttery, and already portioned out! But let’s say you run out of those, or maybe you just prefer that slightly chewier texture you get from traditional pizza dough. Don’t panic! This recipe is really flexible, which makes it such a fantastic base for all sorts of pizza dough appetizers.
If you happen to have a can of refrigerated pizza dough instead of the crescent rolls, you can totally make this work. It just changes the shape a little bit, but the filling stays the same, which is the best part!
Here’s a quick rundown on how to make that swap successfully. I always keep this in my back pocket for when I’m planning ahead and want a more uniform look, or if I’m making a bigger batch for a crowd. You can see a similar dough rolling technique if you check out my instructions for garlic breadsticks, but remember the filling is different here!
Switching to Ready-Made Pizza Dough
Instead of dealing with the triangles, just unroll your refrigerated pizza dough onto a lightly floured surface. The trick here is cutting. You want to slice that dough into rough 2-inch squares. Think about a checkerboard pattern, but with slightly smaller, fatter squares.
From there, you just load them up just like we did with the crescent rolls. Put a small scoop of that garlicky sauce mix in the center, sprinkle the mozzarella, and top with those mini pepperonis. You’ll probably get a few more bites out of a can of pizza dough than you get from the crescent rolls, which is always a win!
Pinching is Still Key With Thicker Dough
With the thicker pizza dough, you need to be extra careful sealing the edges. Because it’s usually one big sheet, you have to create your own seams. Fold the square over diagonally to create a triangle, or you can simply bring two opposing corners up to meet in the middle to create a small pouch shape.
Really press those edges together firmly with your fingers. If the seam separates during baking, you’ll end up with a puddle of cheesy sauce on your sheet pan instead of a neat little bite. Once sealed, brush generously with that melted herb butter before baking, just like before!
Make Ahead Pizza Snacks and Storage for Pepperoni Pizza Bites
Oh, this is my favorite topic! Sometimes you just don’t want to deal with baking when you get home from work, right? Or maybe you made a huge batch for a party and now you have tons of leftovers—lucky you! The good news is that these pizza snacks are fantastic candidates for planning ahead. They truly shine as make ahead pizza snacks.
Seriously, planning ahead means you can have movie night snacks ready to go in under ten minutes flat on a busy evening. Freezing them is my go-to strategy, especially when I need something quick for the kids’ lunchboxes later in the week. Just follow my freezing directions super carefully, and you won’t compromise that great texture we worked so hard to achieve!
Short-Term Storage (Refrigerator)
If you just made them today and plan to eat the rest tomorrow, that’s fine! Store any leftovers in a completely airtight container in the fridge for up to two days. Honestly, they are best the day you bake them, but they’re still pretty tasty chilled.
The best way to reheat these is definitely in the oven. Pop them back onto a baking sheet at 350 degrees Fahrenheit for about 5 to 7 minutes. This crisps the dough back up. Microwaving them turns them into sad, floppy little things, so try to avoid that if you can!
Freezing Instructions for Later
Here’s where you use that freezer space wisely. Once the bites are completely cooled down—and I mean totally cool, not even warm to the touch—you’re ready to bag them up. Place them in a single layer on a baking sheet first and freeze them solid for about an hour. This step is called flash freezing, and it keeps them from sticking together in a giant frozen blob!
Once they are hard little nuggets, transfer them into a heavy-duty freezer bag. I usually press out as much air as possible before zipping it up. They hold up beautifully in the freezer for about two months if you keep them sealed tight. For a great resource on other freezer recipes, check out my guide on freezer breakfast burritos!
Reheating Frozen Bites
When you are ready to serve your glorious make ahead pizza snacks, pull out what you need (no need to thaw first!). Place them on your baking sheet and pop them right back into a 350 degree oven. Bake them for about 10 minutes, checking around the 8-minute mark just because all ovens act differently. They’ll come out hot, crispy, and tasting like you just made them!
Variations on Classic Pepperoni Pizza Bites
While I absolutely stand by the classic, simple recipe we just covered—because sometimes simplicity is perfection—I also love experimenting when I’ve got a little extra time or random veggies lurking in the crisper drawer. These Pepperoni pizza bites are the perfect base canvas for whatever flavor mood you’re in! You can bulk them up, switch out the protein, or even change the spice profile entirely.
Trust me, changing just one small thing can give you a whole new snack experience. If you like the way these roll up, you might also enjoy making my pepperoni pizza pinwheels sometime, which use a similar filling idea!
The Green Boost Addition
For a bit of color and extra nutrition, sauté some finely chopped spinach until all the moisture cooks out. You don’t want wet spinach in your bites, or they’ll get soggy fast! Mix the *dry* spinach right in with your mozzarella and pepperoni before you roll them up. It mixes beautifully and adds that fresh, earthy note that balances the salty pepperoni.
Switching up the Meat Situation
If you’re not feeling only pepperoni, don’t feel restricted! Miniature sausage crumbles that have been fully cooked are amazing in these. Or, if you want something a little more robust, toss in some finely diced, cooked ham alongside the pepperoni slices.
Herbaceous Infusion
We already put garlic powder in the sauce, but for the adults or just a more complex flavor, sprinkle a tiny pinch of dried Italian seasoning or oregano right over the cheese layer before rolling. It really wakes up the tomato sauce flavor and makes these feel a little bit fancier than a standard snack. It’s such a small step, but when you brush on that butter before baking, the aroma is just incredible!
Serving Suggestions for Party Food Pepperoni Bites
These are genuinely the perfect little fuel packs, whether you’re hosting a massive party or just need something grab-and-go for a quiet Saturday afternoon. Because they are so cheesy and flavorful on their own, they really don’t *need* anything else, but dipping just makes everything better, doesn’t it?
I always make sure to set out a couple of bowls of dip on the coffee table when we have people over, especially for major football games. It turns these simple snacks into a real centerpiece appetizer!

- Classic Marinara: You can’t beat the tradition! Heat up a small bowl of good quality jarred marinara sauce. It’s the natural partner to anything pizza-flavored.
- Creamy Ranch: For some reason, the coolness of ranch dressing cuts through the richness of the pepperoni and cheese perfectly. My kids insist on ranch for dipping these every single time.
- Garlic Aioli: If you want something a little fancier, whip up a quick garlic aioli. It’s just mayo, a squeeze of lemon, and a bit of crushed fresh garlic. If you’re looking for a great savory companion dip idea, check out my thoughts on this easy bruschetta dip—that works well too!
For context, try serving these alongside some mild chicken wings or cheese sticks for a full snack spread. They’re definitely designed to be handheld fuel for cheering on your team or keeping the little ones happily occupied while you catch up!
Frequently Asked Questions About Pepperoni Pizza Bites
I get so many questions whenever I post these, and I totally get it! When you find an unbelievably simple recipe like this, you want to make sure you can tweak it for your specific needs—whether that’s using the air fryer or dealing with super picky eaters. Here are the most common things everyone asks about when they are making these Pepperoni pizza bites for the first time.
Let’s dive into what makes people pause before rolling!
Can I use a different dough for these pizza snacks?
Oh yes, you absolutely can! While I swear by the flaky texture of crescent rolls, if you look back in my notes, you’ll see how to swap it out for regular refrigerated pizza dough—just cut it into 2-inch squares. If you happen to have biscuit dough in the fridge, that works too, though it makes a slightly puffier, softer bite. You’ll just flatten the biscuit slightly before adding your ingredients, and you’ll need to seal the edges really, really well when you roll it up. It turns them into wonderful little pizza dough appetizers!
How do I make Air Fryer Pepperoni Bites?
The air fryer is fantastic for these because it gets them incredibly crispy without needing to heat up your big oven. If you want to try making Air fryer pepperoni bites, follow the assembly steps exactly. Once you brush them with butter, lay them in a single layer in the air fryer basket—you’ll definitely need to cook these in batches.
Set your air fryer to 360 degrees Fahrenheit. Cook them for about 9 to 11 minutes. Keep an eye on them after 8 minutes, because air fryers cook fast! If you need more air fryer inspiration after this, I have a great guide on how to cook air fryer frozen shrimp that might come in handy!
Are these Quick Pizza Bites for Kids easy to adapt for picky eaters?
They are one of the most adaptable quick pizza bites for kids I know! If you have a child who absolutely refuses pepperoni (like my nephew does!), simply leave it off just a few of your triangles. You can make them “Plain Cheesy Bites” instead. Or, if they only like ham, swap the pepperoni for finely diced, pre-cooked ham.
You could also use different cheeses—provolone melts beautifully, or even a mix of cheddar and mozzarella. Just keep that sauce amount small, and you’ll have happy, snacking kids!
Nutritional Data for Your Homemade Pizza Snack Ideas
Okay, let’s talk about the fuel factor! Look, I’m not going to pretend these cheesy rolls are a health food, but they are great for parties, game days, or a quick after-school treat. Because we are using store-bought crescent dough, the numbers can vary a bit depending on what brand you grab, so think of this like my best educated guess based on the exact recipe I use.
Knowing what you’re putting into your body (or what your kids are snacking on!) is always important, even when it comes to super fun, simple things like these appetizers. This table breaks down the estimated profile for two bites, which is usually how I serve them up—two at a time!
For reference, I used the stats based on standard refrigerated dough and standard mini pepperoni. If you use whole wheat dough or a reduced-fat cheese, your numbers will shift around a bit!
- Serving Size: 2 bites
- Calories: 180
- Sugar: 2 grams
- Sodium: 450 mg
- Fat: 10 grams
- Saturated Fat: 5 grams
- Unsaturated Fat: 5 grams
- Trans Fat: 0 grams
- Carbohydrates: 16 grams
- Fiber: 1 gram
- Protein: 7 grams
- Cholesterol: 20 mg
Remember, these estimates can slightly change based on the exact dough consistency you buy or if you decide to load up on extra pepperoni. They are a fun indulgence, and knowing the basics helps!
Share Your Best Pizza Bites Tutorial Results
I truly hope this recipe for incredibly fast, cheesy Pepperoni pizza bites has inspired you to get into the kitchen! Honestly, pulling this recipe together only takes a minute, and it brings so much joy when everyone gathers around to grab one (or three!) right out of the oven.
I pour my heart and soul into testing these quick snacks, and nothing makes me happier than knowing they worked out perfectly for you, too. Please, please, please let me know how they turned out!
Did you keep it classic, or did you sneak in some spicy sausage? How did your family like them? Don’t just try this recipe—tell me about it!
- Leave a rating below! Five stars if I’ve saved your busy weeknight, or maybe four if your dough tore a little bit (we all have those days!).
- Drop a comment telling me your biggest success or favorite way to eat these simple cheesy pizza bites.
- If you snapped a picture of your perfectly golden bites, share it! Tag me on social media so I can see your amazing work. You can find more of my kitchen adventures over at my full recipe blog!
Happy cooking, everyone! I can’t wait to read your thoughts on these must-make pizza snacks.
PrintSimple Pepperoni Pizza Bites

Make easy, bite-sized pepperoni pizza snacks using pre-made dough for a quick appetizer or party food.
- Prep Time: 10 min
- Cook Time: 15 min
- Total Time: 25 min
- Yield: 8 servings
- Category: Appetizer
- Method: Baking
- Cuisine: American
- Diet: Vegetarian
Ingredients
- 1 can (8 ounces) refrigerated crescent roll dough
- 1/2 cup pizza sauce
- 1 cup shredded mozzarella cheese
- 1/2 cup mini pepperoni slices
- 1 tablespoon melted butter
- 1/2 teaspoon garlic powder
Instructions
- Preheat your oven to 375 degrees Fahrenheit. Lightly grease a baking sheet.
- Unroll the crescent roll dough and separate it into 8 triangles.
- In a small bowl, mix the pizza sauce with the garlic powder.
- Place about 1 teaspoon of pizza sauce mixture onto the wide end of each dough triangle.
- Sprinkle about 1 tablespoon of mozzarella cheese over the sauce on each triangle.
- Top the cheese with 3 to 4 mini pepperoni slices.
- Roll each triangle up tightly, starting from the wide end and rolling toward the tip. Pinch the seams to seal the edges.
- Place the rolled bites seam-side down on the prepared baking sheet.
- Brush the tops of the bites with melted butter.
- Bake for 12 to 15 minutes, or until the dough is golden brown and cooked through.
- Remove from the oven and let cool slightly before serving.
Notes
- You can use refrigerated pizza dough instead of crescent rolls; cut it into 2-inch squares before filling.
- For extra flavor, sprinkle a pinch of dried oregano over the cheese before rolling.
- These bites freeze well; cool completely, place in a freezer bag, and reheat in a 350 degree oven for 10 minutes.
Nutrition
- Serving Size: 2 bites
- Calories: 180
- Sugar: 2
- Sodium: 450
- Fat: 10
- Saturated Fat: 5
- Unsaturated Fat: 5
- Trans Fat: 0
- Carbohydrates: 16
- Fiber: 1
- Protein: 7
- Cholesterol: 20